Membres

Affichage des articles dont le libellé est DT STAMP AND CREATE WITH MAGNOLIA. Afficher tous les articles

vendredi 14 août 2015

"Stamp & Create With Magnolia", "Anything Goes"

Hello tout le monde! 

Hello everybody!


Un nouveau défi commence à "Stamp & Create With Magnolia"! Le thème est "Tout va". ICI

A new challenge begins to " Stamp and Create With Magnolia "! The theme is "Anything Goes". HERE


Voici ma réalisation!

This is my realization! 


J'ai utilisé du papier "Bazzil Cardstock rose", du papier "Bazzil Cardstock Turquoise" et du papier "Action". En haut, j'ai collé un die-cut "Bordure" réalisé avec un dies "Noor!design".

I used some paper "pink Bazzil Cardstock", some paper "Bazzil Cardstock Turquoise" and some paper "Action". At the top, I stuck a die-cut "Border" realized with a dies "Noor! Design".


J'ai utilisé un tampon "Magnolia".

I used a rubberstamp "Magnolia".

Je l'ai colorisé de la façon suivante: 

- Encre "Distress Tattered Rose" et "Distress Vintage Photo" pour la peau.
- Encres "Distress Antique Linen", "Distress Brushed Corduroy" et "Distress Walnut Stain" pour les cheveux.
- Encre "Distress Picked Raspberry".
- Encre "Distress Salty Ocean".
- Encre "Distress Frayed Burlap".
- Encre "Distress Ripe Persimon".

I colorized it in the following way: 

- Ink "Distress Tattered Rose" and "Distress Vintage Photo" for the skin.
- Ink "Distress Antique Linen", "Distress Brushed Corduroy" and "Distress Walnut Stain" for hair.
- Ink "Distress Picked Raspberry".
- Ink "Distress Salty Ocean".
- Ink "Distress Frayed Burlap".
- Ink "Distress Ripe Persimon".

J'ai découpé l'image et je l'ai collée sur un die-cut réalisé avec un dies "Spellbinders - Nestabilities - Majestic Ovals".

I cut the image and I stuck it on a die-cut realized with a dies " Spellbinders-Nestabilities - Majestic Ovals ".

Enfin, j'ai ajouté les fleurs suivantes:

- Rose blanche (30 mm).
- Rose rose (30 mm).
- Oeillets turquoise.
- Lily turquoise.
- Lilidafts turquoise.
- Lilidaft rose.
- Tulipe rose.
- Rose rose (20 mm).

Finally, I added the following flowers:

- White Rose (30 mm).
- Pink Rose (30 mm).
- Carnations turquoise.
- Lily turquoise.
- Lilidafts turquoise.
- Pink Lilidaft.
- Pink tulip.
- Pink Rose (20 mm).

J'ai ajouté des die-cuts "Feuilles" réalisés avec un dies "Lily Of The Valley".

I added die-cuts "Leaves" realized with a dies "Lily Of The Valley".

Maintenant, c'est à votre tour de réaliser un projet et de tenter votre chance pour remporter un cadeau!

Now, it's your turn to realize a project and to try your luck to to gain a present!


Je vous remercie de votre passage ici et vous souhaite une excellente journée! 

I thank you for your passage here and wish you an excellent day!


Scrapbisss

Scrapkissessss


vendredi 19 juin 2015

"Stamp & Create With Magnolia", "Patriotic"

Hello tout le monde! 

Hello everybody!


Un nouveau défi commence à "Stamp & Create With Magnolia"! Le thème est "USA Patriotique". ICI

A new challenge begins to " Stamp and Create With Magnolia "! The theme is "Patriotic USA". HERE


-----------------------------------------------


I design for

------------------------------------------------

Un nouveau défi commence sur le blog "Scrapbooker Phd". Le thème est "Patriotic".

A new challenge begins on the blog " Scrapbooker Phd ". The theme is "Patriotic".


Voici ma réalisation!

This is my realization! 

J'ai utilisé un fichier "Snap Dragon Snippets" que vous pouvez trouver dans la boutique "Silhouette Store" ICI.

I used a file "Snap Dragon Snippets" whom you can find in the shop " Silhouette Store " HERE.

Vous pouvez également trouvé le kit complet dans la boutique "SVG Attic", ICI.

You can also found the complete kit in the shop " SVG Attic ", HERE.


Pour réaliser cette boite, j'ai utilisé des papiers "Maja Design", collection "Life in the Country", du papier "Bazzil Cardstock Prismatic Crème", du papier "Bazzil Cardstock rouge", du papier "Bazzil Cardstock bleu" et du papier "Bazzil Cardstock blanc".

To realize this box, I used papers "Maja Design", collection " Life in the Country music ", some paper " Bazzil Cardstock Prismatic Cream", some paper "Bazzil Cardstock red", some paper "Bazzil Cardstock blue" and some paper "Bazzil Cardstock white".

Tous les papiers imprimés sont encrés à l'encre "Distress Walnut Stain".

All the printed papers are inked to the ink "Distress Walnut Stain".

La découpe "Feu d'artifice" à l'intérieure a été découpé dans du papier collant "double-face". Ensuite, je l'ai recouverte de paillettes "Silver".

The cut "Firework" in the internal was cut from the gummed paper "double-face". Then, I covered it with glitter " Silver ".


J'ai utilisé un tampon "Magnolia".

I used a rubberstamp "Magnolia".

Je l'ai colorisé de la façon suivante: 

- Encre "Distress Tattered Rose" et "Distress Vintage Photo" pour la peau.
- Encres "Distress Antique Linen", "Distress Brushed Corduroy" et "Distress Walnut Stain" pour les cheveux.
- Encre "Distress Festive Berries".
- Encre "Distress Chipped Saphir".
- Encre "Distress Frayed Burlap".
- Crayon aquarelle jaune.

I colorized it in the following way: 

-Ink Distress Tattered Rose "and "Distress Vintage Photo" for the skin.
-Ink Distress Antique Linen " "Distress Brushed Corduroy" and "Distress Walnut Stain" for hair.
-Ink "Distress Festive Berries".
-Ink "Distress Chipped sapphire".
-Ink "Distress Frayed Burlap".
-Pencil yellow watercolor.


Sur chaque partie latérale, j'ai collé une rose "Crème" (30 mm), une rose rose (20 mm), une fleur de cerisier rouge et une "Lilidaft" crème.

On side each party, I stuck a rose "Cream" (30 mm), a pink rose (20 mm), a flower of red cherry tree and a "Lilidaft" cream.

J'ai ajouté un double-noeud réalisé avec du ruban "Organza rouge" et je l'ai décoré avec une "Lilidaft" crème.

I added a double-knot realized with the ribbon " red Organza " and I decorated it with "Lilidaft" cremate.


Maintenant, c'est à votre tour de réaliser un projet et de tenter votre chance pour remporter un cadeau!

Now, it's your turn to realize a project and to try your luck to to gain a present!


Je vous remercie de votre passage ici et vous souhaite une excellente journée! 

I thank you for your passage here and wish you an excellent day!


Scrapbisss

Scrapkissessss


vendredi 24 avril 2015

"Snap Dragon Snippets", My Inspirational Project

Bonjour tout le monde! 

Hello everybody! 

Aujourd'hui, je viens partager avec vous une belle nouvelle! je rejoins la formidable équipe DT de "Snap Dragon Snippets"!

 Today, I come to share with you a beautiful piece of news! I join the great DT team of "Snap Dragon Snippets"!


Voici en images!

Here is in images!


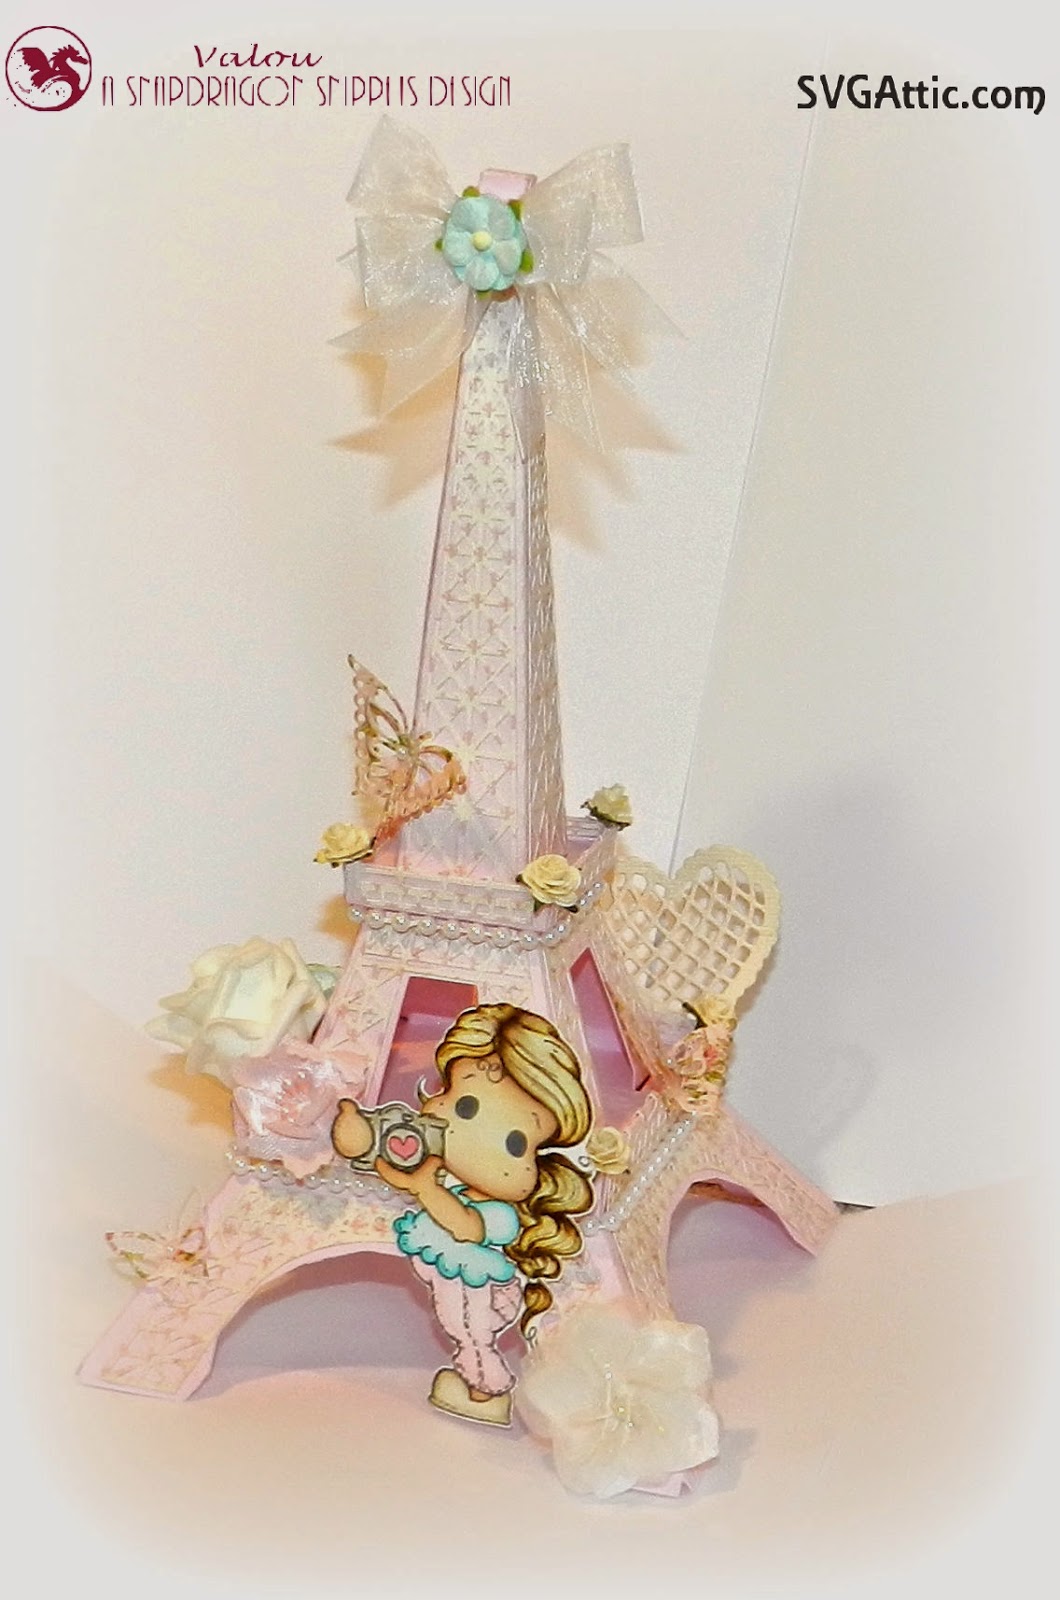
Pour réaliser cette Tour Eiffel, j'ai utilisé le fichier de coupe de la boutique "Snap Dragon Snippets" que vous pouvez trouver ICI.

To realize this Eiffel Tower, I used the file of cutting of the shop " Snap Dragon Snippets " which you can find HERE.

J'ai utilisé des papiers "Pion Design", collection "Paris Flea Market" et du papier "Bazzil Cardstock rose".

I used papers "Pion Design", collection "Paris Flea Market" and some paper " pink Bazzil Cardstock ".


J'ai utilisé un tampon "Magnolia Ink".

I used a rubberstamp "Magnolia Ink".

Je l'ai colorisé de la façon suivante:

- Encre "Distress Tattered Rose" et "Distress Vintage Photo" pour la peau.
- Encre "Distress Antique Linen", "Distress Brushed Corduroy" et "Distress Walnut Stain" pour les cheveux.
- Encre "Distress Peacock Feathers".
- Encre "Distress Spun Sugar".
- Encre "Distress Frayed Burlap".
- Encre "Distress Pumice Stone".
- Encre "Distress Worm Lipstick".

I colorized it in the following way:

- Ink "Distress Tattered Rose" and "Distress Vintage Photo" for the skin.
- Ink "Distress Antique Linen", "Distress Brushed Corduroy" and "Distress Walnut Stain" for hair.
- Ink "Distress Peacock Feathers".
- Ink "Distress Spun Sugar".
- Ink "Distress Frayed Burlap".
- Ink "Distress Pumice Stone".
- Ink "Distress Worm Lipstick".


Tout autour de chaque étage, j'ai collé du ruban de perles nacrées blanches.

Everything around every floor, I stuck of the ribbon of white pearly pearls.

J'ai ajouté une rose blanche en mousse, une fleur rose en tissu et une rose "vert jade" (30 mm).

I added a foam white rose, a cloth pink flower and a rose " green jade " (30 mm).


J'ai également collé des die-cuts "Papillons" ici et là, réalisés avec des dies "Noor!design".

I also stuck die-cuts "Butterflies" here and there, realized with dies " Noor! Design ".

A chaque coin, j'ai collé une rose ivoire (10 mm).

In every corner, I stuck a rose ivory (10 mm).


A l'arrière, j'ai collé un die-cut "Bordure - Coeurs" réalisé avec un dies "Noor!design".

In the back, I stuck a die-cut " Border - Hearts " realized with a dies " Noor! Design ".


Et voilà! j'espère que ma réalisation vous a plus et qu'elle vous inspirera. 

Here we are! I hope that my realization has you more and that it will inspire you.


Je vous remercie de votre passage et vous souhaite une excellente journée! A bientôt! 

I thank you for your passage and wish you an excellent day! Bye for now!

Hugs, 


vendredi 27 février 2015

"Stamp & Create With Magnolia", "Frame"

Hello tout le monde! 

Hello everybody!


Un nouveau défi commence à "Stamp & Create With Magnolia"! Le thème est "Cadre". ICI

A new challenge begins to " Stamp and Create With Magnolia "! The theme is "Frame". HERE


-----------------------------------------------


Voici ma réalisation!

This is my realization! 


Ce petit cadre est réalisé 100 % papiers. La base est réalisée avec du papier "Bristol" blanc. Ensuite, j'ai recouvert avec du papier "Action" pailleté. Les bords sont encrés à l'encre "Distress Walnut Stain".

This small frame is realized 100 % papers. The base is realized with some paper white "Bristol". Then, I covered with some paper "Action" spangled. Edges are inked to the ink "Distress Walnut Stain".


J'ai utilisé un tampon "Magnolia".

I used a rubberstamp "Magnolia".

Je l'ai colorisé de la façon suivante: 

- Encre "Distress Tattered Rose" et "Distress Vintage Photo" pour la peau.
- Encres "Distress Antique Linen" et "Distress Walnut Stain" pour les cheveux.
- Encre "Distress Festive Berries".

I colorized it in the following way: 

- Ink "Distress Tattered Rose" and "Distress Vintage Photo" for the skin.
- Ink "Distress Antique Linen" and "Distress Walnut Stain" for hair.
- Ink "Distress Festive Berries".


Pour la décoration, j'ai ajouté une découpe "Coin - Note de musique". Vous pouvez trouver le fichier dans la boutique ICI.

For the decoration, I added a cut " Corner - Musical note ". You can find the file in the shop HERE.

Ensuite, j'ai ajouté une rose blanche (30 mm), une fleur rouge, une rose rouge (20 mm) et une "Lilidaft" blanche.

Then, I added a white rose (30 mm), a red flower, a red rose (20 mm) and white "Lilidaft".

Maintenant, c'est à votre tour de réaliser un projet et de tenter votre chance pour remporter un cadeau!

Now, it's your turn to realize a project and to try your luck to to gain a present!


Je vous remercie de votre passage ici et vous souhaite une excellente journée! 

I thank you for your passage here and wish you an excellent day!


Scrapbisss

Scrapkissessss


vendredi 30 janvier 2015

"Stamp & Create With Magnolia", " Add some hearts"

Hello tout le monde! 

Hello everybody!


Un nouveau défi commence à "Stamp & Create With Magnolia"! Le thème est "Ajouter des coeurs". ICI

A new challenge begins to " Stamp and Create With Magnolia "! The theme is "Add some hearts". HERE


Voici ma réalisation!

This is my realization! 


J'ai utilisé du papier "Bazzil Cardstock blanc" et du papier "Action". J'ai découpé mes papier avec la machine "Silhouette Studio".

I used some paper " white Bazzil Cardstock " and some paper "Action". I cut my paper with the machine " Silhouette Studio ".

Sur le haut, j'ai collé un die-cut "Bordure - Papillons" réalisé avec un dies "Noor!design".

On the top, I stuck a die-cut " Border - Butterflies " realized with a dies " Noor! Design ".


J'ai utilisé un tampon "Magnolia". 

Je l'ai colorisé de la façon suivante: 

- Encre "Distress Tattered Rose" et "Distress Vintage Photo" pour la peau.
- Encres "Distress Antique Linen" et "Distress Walnut Stain" pour les cheveux.
- Encre "Distress Worm Lipstick".
- Encre "Distress Fayded Jeans".
- Encre "Distress Brown Sugar".
Encre "Distress Pumice Stone".


I colorized it in the following way: 

- Ink "Distress Tattered Rose" and "Distress Vintage Photo" for the skin.
- Ink "Distress Antique Linen" and "Distress Walnut Stain" for hair.
- Ink "Distress Worm Lipstick".
- Ink "Distress Fayded Jeans".
- Ink "Distress Brown Sugar".
Ink "Distress Pumice Stone".

J'ai découpé mon image avec un dies "Spellbinders - Nestabilities - Majestic Ovals". Tout autour, j'ai tamponné différents tampons avec de l'encre "Versafine Vintage Sepia".

I cut my image with a dies " Spellbinders-Nestabilities - Majestic Ovals ". Any goshawk, I stamped various rubberstamps with some ink " Versafine Vintage Sepia ".

Sous l'image, j'ai collé de la dentelle de Calais blanche et du ruban "Seam - Tulip Pink".

Under the image, I stuck of the white lace of Calais and the ribbon " Seam - Tulip Pink ".


Ensuite, j'ai ajouté les embellissements suivantes:

- Rose rose (50 mm).
- Rose bleue (30 mm).
- Rose rose (20 mm).
- Fleur de cerisier blanche.
- Lilidaft blanche.
- Boules de neige roses.
- Epingle nacrée rose.

Then, I added the embellishments following ones:

- Pink Rose (50 mm).
- Blue Rose (30 mm).
- Pink Rose (20 mm).
- White flower of cherry tree.
- White Lilidaft.
- Pink snowballs.
- Pink pearly pin.


Les découpes "Coeurs" sont réalisées avec la machine "Silhouette Studio". Je les ai encrées avec de l'encre "Distress Walnut Stain".

The cuts "Hearts" are realized with the machine " Silhouette Studio ". I inked them with some ink "Distress Walnut Stain".

Le sentiment est un tampon "Penny Black" que j'ai tamponné avec de l'encre "Versafine Onyx Black".

The feeling is a rubberstamp " Penny Black " which I stamped with some ink "Versafine Onyx Black".

J'ai réalisé un double-noeud avec de la dentelle rose que j'ai décoré avec une rose blanche et rose (30 mm).

I realized a double-knot with the pink lace which I decorated with a white and pink rose (30 mm).

Enfin, j'ai ajouté une rose rose (20 mm), une rose saumon (15 mm), une "Lilidaft" blanche et une "Lilidaft" bleue.

Finally, I added a pink rose (20 mm), a salmon pink (15 mm), white "Lilidaft" and blue "Lilidaft".

Les deux die-cuts "Papillons" sont réalisés avec un dies "Noor!design".

Both die-cuts "Butterflies" are realized with a dies " Noor! Design ".


Maintenant, c'est à votre tour de réaliser un projet et de tenter votre chance pour remporter un cadeau!

Now, it's your turn to realize a project and to try your luck to to gain a present!


Je vous remercie de votre passage ici et vous souhaite une excellente journée! 

I thank you for your passage here and wish you an excellent day!


Scrapbisss

Scrapkissessss


vendredi 19 décembre 2014

"Stamp & Create With Magnolia", "Anything Goes"

Hello tout le monde! 

Hello everybody!


Un nouveau défi commence à "Stamp & Create With Magnolia"! Le thème est "Tout va". ICI

A new challenge begins to " Stamp and Create With Magnolia "! The theme is " Anything Goes". HERE


Voici ma réalisation!

This is my realization! 


J'ai utilisé du papier "Bazzil Cardstock Vanille" et des papiers "Action". Les papiers sont usés avec le "Old Distresser" et encrés à l'encre "Distress Walnut Stain".

I used some paper "Bazzil Cardstock Vanille" and papers "Action". Papers are worn out with "Old Distresser" and inked to the ink "Distress Walnut Stain".

Ensuite, j'ai ajouté un die-cut réalisé avec un dies "Noor!design", "Round 2". Je l'ai également encré à l'encre "Distress Walnut Stain".

Then, I added a die-cut realized with a dies " Noor! Design ", " Round 2 ". I also inked it to the ink "Distress Walnut Stain".

Autour du papier à pois, j'ai collé deux die-cuts "Bordure - Papillons" réalisés avec un dies "Noor!design". Je les ai embossés avec de la poudre "Frantage - Shabby White".

Around the polka-dot paper, I stuck two die-cuts " Border - Butterflies " realized with a dies " Noor! Design ". I embossed them with some powder " Frantage - Shabby White ".


J'ai utilisé un tampon "Magnolia". 

Je l'ai colorisé de la façon suivante: 

- Encre "Distress Tattered Rose" et "Distress Vintage Photo" pour la peau.
- Encres "Distress Antique Linen" et "Distress Walnut Stain" pour les cheveux.
- Encre "Distress Mowed Lawn".
- Encre "Distress Picked Raspberry".
- Encre "Distress Spun Sugar".
Encre "Distress Pumice Stone".

I colorized it in the following way: 

- Ink "Distress Tattered Rose" and "Distress Vintage Photo" for the skin.
- Ink "Distress Antique Linen" and "Distress Walnut Stain" for hair. 
- Ink "Distress Mowed Lawn".
- Ink "Distress Picked Raspberry".
- Ink "Distress Spun Sugar".
Ink "Distress Pumice Stone".

Sous l'image, j'ai collé deux die-cuts:

- Die-cut réalisé avec un dies "Spellbinders - Nestabilities - Majestic Ovals" que j'ai gaufré avec un classeur "Provocraft - Peas".
- Die-cuts "Briques" que j'ai réalisé avec un dies "Noor!design" et encré avec de l'encre "Distress Walnut Stain".

Under the image, I stuck two die-cuts:

- Die-cut realized with a dies " Spellbinders-Nestabilities - Majestic Ovals " that I have gaufré with a file " Provocraft-Peas ".
- Die-cuts "Bricks" that I realized with a dies " Noor! Design " and inked with some ink " Distress Walnut Stain ".


Pour la décoration, j'ai ajouté les embellissements suivants:

- Fleurs réalisées avec un dies "Magnolia Ink" ainsi que les feuilles.
- Rose blanche et rose (30 mm) (WOC).
- Fleur de cerisier blanche (WOC).
- Rose rose (20 mm) (WOC).
- Rose blanche et bleue (20 mm) (WOC).
- Boules de neige roses (WOC).
- Rosebuds (WOC).
- Die-cut "Swirl" réalisé avec un dies "Marianne Design".

For the decoration, I added the following embellishments:

- Flowers realized with a dies " Magnolia Ink " as well as leaves.
- White and pink Rose (30 mm) (WOC).
- Flower of cherry tree white (WOC).
- Pink Rose (20 mm) (WOC).
- White and blue Rose (20 mm) (WOC).
- Pink snowballs (WOC).
- Rosebuds (WOC).
- Die-cut " Swirl " realized with a dies "Marianne Design".


Sous l'image, j'a collé de la dentelle blanche et du ruban "Vichy Bleu". Ensuite, j'ai collé un double-noeud que j'ai réalisé avec du ruban "Organza bleu" et que j'ai décoré avec une "Lilidaft rose" et un charm "Love".

Under the image, I stuck of the white lace and the ribbon " Vichy Blue ". Then, I stuck a double-knot which I realized with the ribbon " blue Organza " and which I decorated with one " pink Lilidaft " and a charm "Love".


Maintenant, c'est à votre tour de réaliser un projet et de tenter votre chance pour remporter un cadeau!

Now, it's your turn to realize a project and to try your luck to to gain a present!


Je vous remercie de votre passage ici et vous souhaite une excellente journée! 

I thank you for your passage here and wish you an excellent day!


Scrapbisss

Scrapkissessss


lundi 1 décembre 2014

"Snap Dragon Snippets", my Inspirational Creation - DT Call Noor!Design

Bonjour tout le monde! 

Hello everybody! 

Aujourd'hui, je viens partager avec vous une belle nouvelle! je rejoins la formidable équipe DT de "Snap Dragon Snippets"!

 Today, I come to share with you a beautiful piece of news! I join the great DT team of "Snap Dragon Snippets"!


Je tente ma chance à l'appel DT de "Noor!Design UK", ICI.

I try my luck in the call DT of " Noor! Design UK ", HERE.


"My name is Valérie ALLARD, more known under the pen name Valou250809. I lived in Belgium just next to the big city of Chaleroi and in 40 kilometers from Brussels.
I have 5 children from 5 to 15 years old. I scrappe since 2006 and my style is the “Shabby Chic Style” but I know also how to create in a vintage style or C&S without any problem. I create a great deal of cards and of projects home decoration.
All the material that I so use that techniques are described in every article which I post on my blog with my realizations.
I’m disabled person for five years maintaining what allow me to scrap every day. I’m very available. I scrappe approximately 8 hours a day.
I’m someone very dynamic and I adore the teamwork. I’m always ready to help and to support the others! I like the sharing and the scrapbooking is ideal for it quite as to work in one Design Team.
I speak English (I studied it during 9 years) and I possess a translator on my blog.
I was lucky enough to be twice published in a French magazine " Passion Scrapbooking ".
I’m at present member of the team DT of the differents Challenges’ Blogs and Shops' Blogs (Cards Und More Shop, Artfull Crafts Shop, ...). Previously, I was member of the team DT of a shop of stamps (AbsolumentScrap), of a Belgian Shop (SrapIdees), of Ooh La La Designs and a French Shop (Auberge des Loisirs).

Here is also a link gathering other projects as a mini album "Baby", canvas, cards: http://lafeerieduscrap.blogspot.be/p/realisations-2013.html"


Voici en images!

Here is in images!


Pour réaliser cet ensemble, j'ai utilisé le fichier de "Snap Dragon Snippets", HERE

To realize this set, I used the file of "Snap Dragon Snippets", HERE.

Toutes les pièces sont découpées avec la machine "Silhouette Studio".

All the parts are cut with the machine " Silhouette Studio ".

J'ai utilisé les papiers suivants:

- Bazzil Cardstock blancs.
- Papiers "Maja Designs", "Winter Collection" and "Spring Collection".
- Papier bleu "Action".
- Carton de récupération.
- Bristol blanc.
- Cardstock marron.

I used the following papers:

- White Bazzil Cardstock.
- Papers " Winter Collection " and "Spring Collection".
- Blue paper "Action".
- Cardboard of recycling.
- White Bristol.
- Cardstock chestnut.

Tout autour, j'ai ajouté des barrières découpées avec la "Silhouette Studio". Ensuite, devant, j'ai collé des dies-cuts réalisés avec un dies "Noor!Design", "Bordure Snowflakes".

Any goshawk, I added barriers cut with the " Silhouette Studio ". Then, in front of, I stuck dies-cuts realized with a dies " Noor!Design ", "Border Snowflakes".

Enfin, j'ai collé du ruban "Organza Mahogany" et j'ai fini avec un petit noeud.

Finally, I stuck of the ribbon " Organza Mahogany " and I finished with a small knot.


A gauche de la maison, j'ai décidé de faire une extension pour réaliser le jardin.

To the left of the house, I decided to make an extension to realize the garden.

Tout le fond est recouvert de neige artificielle en bombe.

All the bottom is covered with artificial snow in spray.

J'ai réalisé une patinoire avec un die-cut réalisé avec un dies "Noor! Design", "Round 2".

I realized an ice rink with a die-cut realized with a dies " Noor! Design ", " Round 2 ".


J'ai réalisé un arbre avec un fichier de coupe "Silhouette Studio Store". Dessus, j'ai ajouté un peu de neige artificielle et diverses perles nacrées bleues, roses et blanches pour représenter des boules de Noël.

I realized a tree with a file of cut " Silhouette Studio Store". Above, I added a little artificial snow and diverse blue, pink and white pearly pearls to represent Christmas baubles.

J'ai également ajouté un "Treillis" en bois de la boutique "HobbyCutz". Dessus, j'ai collé quelques perles nacrées ainsi que quelques fleurs: Poinsettia blanc, Poinsettia bleu, Rose blanche et rouge (WOC), Roses blanches (WOC), Rose bleue "Kaisercraft" et des baies rouges pailletées. Au pied de ce "Treillis", j'ai collé une pomme de pin argentée et pailletée, une rose blanche en tissu, une "Lily" rouge et une baie rouge pailletée.

I also added a wooden "Treillis" of the shop " HobbyCutz ". Above, I stuck some pearly pearls as well as some flowers: white Poinsettia, blue Poinsettia, white and red Rose ( WOC), white Rose ( WOC), blue Rose " Kaisercraft " and spangled red berries. At the foot of this "Treillis", I stuck a silvery and spangled pine cone, a cloth white rose, a red "Lily" and a spangled red berry.


Ensuite, j'ai ajouté un petit traineau en verre. Dessus, j'ai collé une fleur rouge.

Then, I added a small glass sled. Above, I stuck a red flower.

Pour le reste, j'ai ajouté un renne découpé avec la "Silhouette Sutdio" et des die-cuts "Sapins".

For the rest, I added a reindeer cut with "Silhouette Sutdio" and die-cuts "Fir trees".

Sur le sol, j'ai collé quelques boules blanches pailletées en polyester.

On the ground, I stuck some white balls spangled in polyester.


J'ai utilisé plusieurs tampons "Magnolia Ink".

I used several rubberstamps " Magnolia Ink ".

Je les ai colorisés avec les encres suivantes:


- Encre "Distress Tattered Rose" et "Distress Vintage Photo" pour la peau.

- Encre "Distress Antique Linen", "Brushed Corduroy" et "Distress Walnut Stain" pour les cheveux.
- Encre "Distress Fayded Jeans".
- Encre "Distress Aged Mahogany".
- Encre "Distress Pumice Stone".
- Glitter Stickels Diamond.

I colorized them with the following ink:

- Ink "Distress Tattered Rose" and "Distress Vintage Photo" for the skin.
- Ink "Distress Antique Linen", "Brushed Corduroy" and "Distress Walnut Stain" for hair.
- Ink "Distress Fayded Jeans".
- Ink "Distress Aged Mahogany".
- Ink "Distress Pumice Stone".
- Glitter Stickels Diamond.


Sur le toit, j'ai ajouté des morceaux de guirlande, de la neige artificielle et un petit coq en bois.

On the roof, I added pieces of garland, some artificial snow and a small wooden cock.


Sur la fenêtre du haut, j'ai ajouté un noeud réalisé avec un morceau de ruban "Organza Mahogany" et décoré avec une rose blanche (15 mm) (WOC).

On the window of the top, I added a knot realized with a piece of ribbon " Organza Mahogany " and decorated with a white rose (15 mm) ( WOC).

J'ai ajouté une petite bannière réalisée avec un dies "Noor!Design" sur laquelle j'ai collé un "Rub-On", "Merry Christmas". Je l'ai encrée à l'encre "Distress Walnut Stain".

I added a small banner realized with a dies " Noor! Design " on whom I stuck "Rub-On", "Merry Christmas". I inked it to the ink "Distress Walnut Stain".


Pour le reste, j'ai ajouté différents embellissements:

- Pomme de pin pailletée et argentée.
- Embellissement rouge pailleté.
- Embellissement en bois (reçu en cadeau dans un magazine).
- Hache en plastique (récupérée sur une bûche de Noël l'année dernière).

For the rest, I added various embellishments:

- Spangled and silvery pine cone.
- Spangled red embellishment.
- Wooden embellishment (received in present in a magazine).
- Plastic ax (recycling).


Et voilà! j'espère que ma réalisation vous a plus et qu'elle vous inspirera. 

Here we are! I hope that my realization has you more and that it will inspire you.


Je vous remercie de votre passage et vous souhaite une excellente journée! A bientôt! 

I thank you for your passage and wish you an excellent day! Bye for now!

Hugs, 


Je tente ma chance aux défis suivants:

I try my luck in the following challenges:

- Magnolia Mania: Tout va - Anything Goes.
- Animal Friends Challenge: Tout va avec un animal - Anything goes with an animal.
- Irishteddys:  - Paillettes / Sapin - Glitter / Tanne.
- Balisa: Noël - Christmas.
- Bunny Zoe's Crafts: Neige - Snow.
- Simply Magnolia: Vintage - Vintage.
- Noor!design UK: Noël - Christmas.
- The Ribbon Girl "Magnolia Only": Noël - Christmas.
- Tilda's Town: Hiver - Winter.
- Time for Magnolia Challenge: Noël couleurs non traditionnelles - Christmas in non-traditional Colours.
- Lovely Hänglar or Sweet Magnolia: Utiliser un die-cut - Use a die-cut.
- Penny Black and More: Tout va - Anything Goes.
- Di's Digi Design: Création pour ou avec un enfant - Creations for or with kids challenge.